Simple Custom CSS & JS Pro – Documentation
Installation and Updates
- Download the .zip file from the email you received.
- Go to: WP Admin > Plugins > Add New to upload the file you downloaded with Choose File.
- Activate the plugin.
More information at: Installing and Managing Plugins.
When upgrading from the free to the PRO version, the Custom Codes from the free version will be automatically overtaken by the PRO version and the free plugin will get deactivated.
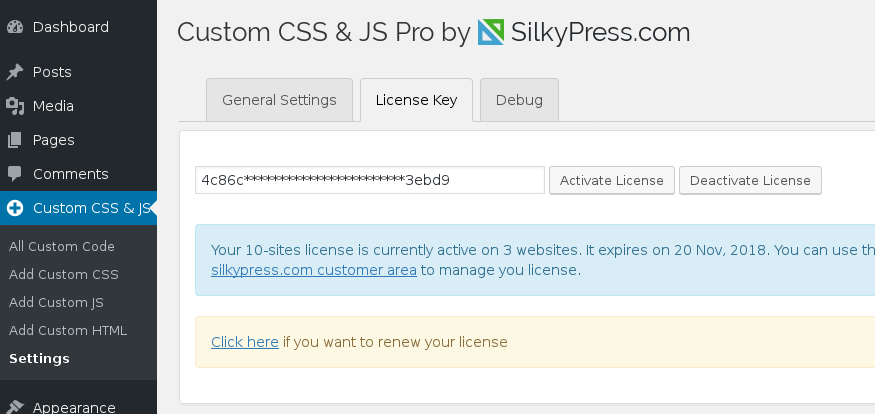
Don’t forget to activate the license in the Custom CCS & JS > Settings > License Key tab, as shown below.
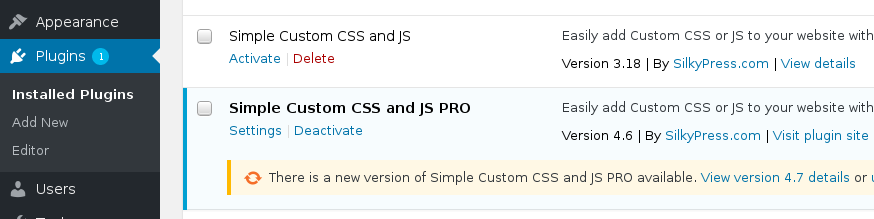
For updates you’ll be notified in the WorPress Admin -> Plugins page and by clicking update now you will receive the latest version.
Backend Features
The Editor
The editor is based on the well known CodeMirror text editor, which is specialized in editing code.
You don’t need to add the CSS/JavaScript opening and closing tags, that is handled automatically. Below the editor you’ll find the Last edited by name on date line to let you know who last edited the code.
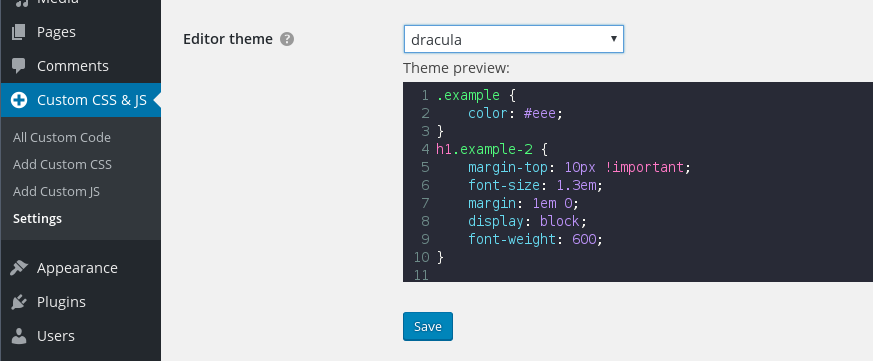
You have the possibility to change the editor’s theme on the WP Admin > Custom CSS & JS > Settings page to better fit your taste.
The Options
The following image shows the options meta box:
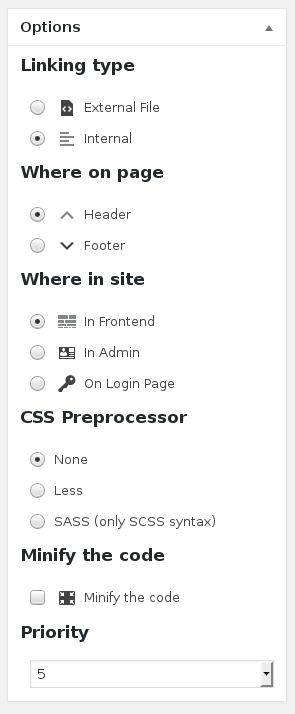
The meaning of the options are:
Linking type
- External file – the code will be linked as an external file with the
<link rel="stylesheet" href="https://www.example.com/wp-content/uploads/custom-css-js/code_id.css" media="all"/>or the<script src="https://www.example.com/wp-content/uploads/custom-css-js/code_id.js"></script>code. - Internal – the code will be outputed directly in the header or the footer of the HTML code.
The externally linked file has the advantage that it can be cached in the browser and it will not be loaded everytime the browser reloads.
Where on page
- Header – the code will be linked or outputed in the header of the HTML code.
- Footer – the code will be linked or outputed in the footer of the HTML code.
The external CSS files will always be linked in the header. For the external JavaScript file you have the option to link them in the header or in the footer or the HTML code.
Where in site
- In Frontend – the code will be shown only in the frontend of the website.
- In Admin – the code will be shown only in the backend of the WordPress installation.
- On Login Page
CSS Preprocessor option will be shown only for CSS codes.
- None – no preprocessing will be performed.
- LESS – the code will be preprocessed according to the LESS rules.
- SASS (only SCSS syntax) – the code will be preprocessed according to the SASS rules, but only with the SCSS syntax. For example, this will work:
and this will not work:$primary-color: #333; body { color: $primary-color; }$primary-color: #333 body color: $primary-color
If you don’t know what a CSS Preprocessor is, then you should leave it to None.
Minify the code
Minifying the code means removing the unnecessary characters (like whitespace, new line or comments) from the code in order to reduce the size of the code.- Enabled – the code will be minified in a similar way to the YUI Compressor.
- Disabled – the code will be outputed exactly the way it was written in the editor.
Priority
Code with a “1” priority will be printed first on the website, then all the other codes according to their priority up to “10”. Note that the priority is only relative to other custom codes and not relative to CSS or JS from the theme or other plugins.
Generally, a WordPress installation shows the CSS in the following order:
- 1. Theme’s and plugins’ external stylesheets (intermixed)
- 2. Simple Custom CSS and JS internal and external stylesheets (intermixed). A custom code’s Priority setting will have effect only within this section.
- 3. CSS codes added with the theme’s Customizer
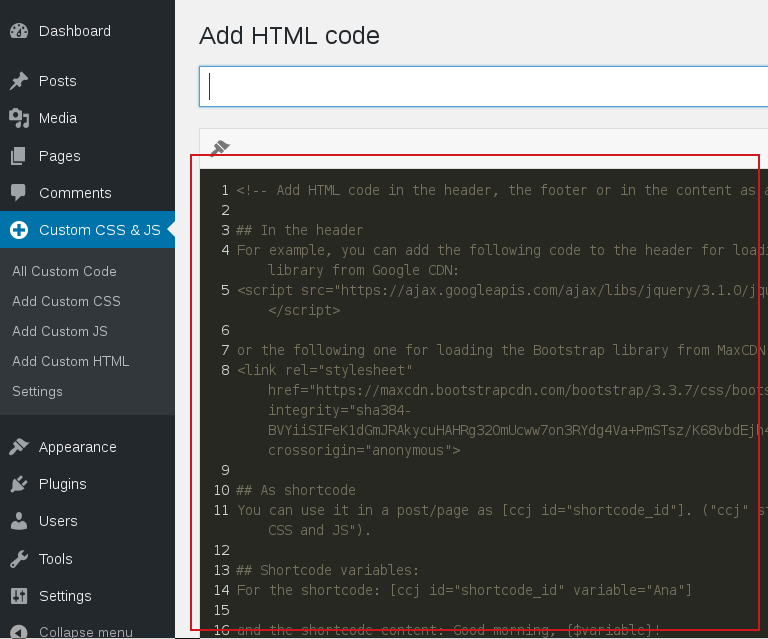
Add HTML within the Page
If you want to add some HTML code within the page, whether in the page/post’s content, or within a widget, then you can make use of the “shortcode” functionality.
All the shortcode functionality is explained in detail also in the comments found in the editor when you click on the “Add HTML Code”, so you always have the documentation at hand, as shown in the following screenshot:
In the following screencast you’ll find an example of how to add Google Maps in a post by using the plugin with a shortcode:
For multisite WordPress installations, any shortcode added on a subsite can be used on that particular subsite’s pages/posts. The shortcodes added on the main site with the “Apply network wide” option enabled can be used on the main site and all the subsites. If a shortcode added on a subsite has the same id as a shortcode added on the main site, then the shortcode from the subsite will be prioritized and shown on the particular subsite.
Preview the Code
This is a handy way of checking if the code you’re adding to the website looks alright or not before you publish it.

By clicking on the Preview Changes button, the preview page will be opened in a new tab. The generated URL in the new tab can be shared with your co-workers or your customers, so you can ask their opinion about the changes before making them live. When you make additional changes to the code, you have to regenerate the preview by clicking the Preview Changes button again.

When previewing a code, the rules from the Apply only on these URLs section are ignored.
Apply only on these Pages
By default the code is applied on the entire website. Use this feature to restrict the pages on which the code shows up. For example, the following settings will apply the code on the entire website, except on the pages with the URL containing the word “category”:

You can combine the rules to match exactly the pages you want. The combining works like a logical AND, which means the two rules from the example above can be read as:
Apply the code on All Website and the URL not contains the word category.
The following rules are available:
- All Website
- Homepage (as defined by the “Your homepage displays:” option on the WP Admin -> Settings -> Reading page)
- URL contains <string>
- URL not contains <string>
- URL is equal to <string> (see below)
- URL not equal to <string> (see below)
- URL starts with <string> (see below)
- URL ends by <string>
- WP Conditional Tag <string> (see below)
For the URL is equal to, URL not equal to, URL starts with rules you have to use a relative URL that starts with a single slash. For example, if you want to match the products, the following rule will suffice Starts with "/products/", as shown in the below example:

With the WP Conditional Tag rule you can use any of the WordPress native Conditional Tags normally used in template files. For example, for displaying a code only on archive pages for any category, except the `movies` category use the WP Conditional Tag is_archive() && ! is_category( 'movies' ) rule, as shown below:

You can also use conditional tags specific to different plugins, like WooCommerce (here is a list of conditional tags for the WooCommerce pages). For example, if you want to display a code only on the `games` product category, then you can match it with the is_product_category('games') rule. Note that this conditional tag will work only as long as WooCommerce is installed and activated on your website. If you deactivate the WooCommerce plugin for a moment, then it might show an error on the frontend because the “is_product_category” function isn’t present on the website. You can avoid this issue by checking first if the function exists on the website with the function_exists('is_product_category') code in the same conditional tag. So, instead of the previous conditional tags you should write function_exists('is_product_category') && is_product_category('games').
By default the WP Conditional Tag rules are disabled for PHP < v7.0. Enabling the WP Conditional Tag rules for PHP < v7.0 can be done by adding the following PHP snippet to your website:
add_filter( 'ccj_enable_wp_conditional_tags', '__return_true' );
Each custom code can have no more than 25 rules. This is not a bug, but a limit set in order to encourage you to rewrite the rules in a more efficient way, for example with a WP Conditional Tag, or with broader rules like URL starts with ... or URL ends with ....
Nevertheless, this limit can overriden by adding &limit_nr_rules=no to the URL of the “Edit CSS/JS/HTML code” page (for example: https://www.example.com/wp-admin/post.php?post=123&action=edit&limit_nr_rules=no).
Code Revisions
Code revisions are very useful especially if you’re working in a team and want to see what changes were made to the code over time.
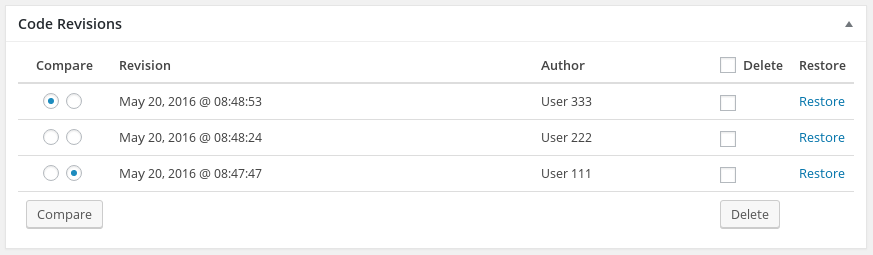
You can compare two revisions, which gives you a side-by-side diff output of the code and in addition the changes to the options.
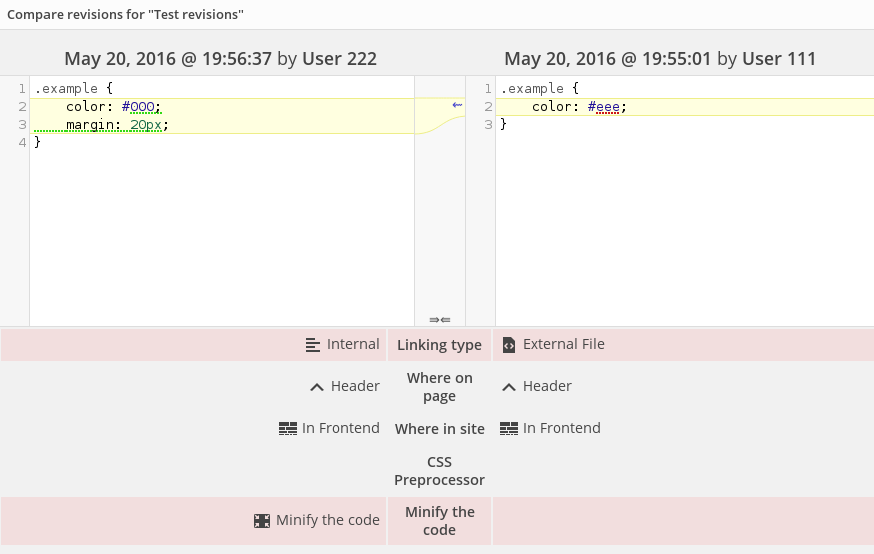
In the example above you see that User 222 changed a line, added a line and modified two options (Linking type and Minify the code).
Codes on Multisite Networks
By default any code written on a multisite subsite will be visible only on the subsite.
Nevertheless, on the edit page of any custom CSS/JS/HTML code on the main subsite there is an option available called “Apply network wide”. If the option is enabled, then the code will be present on all the multisite’s subsites where the Simple Custom CSS and JS Pro plugin is enabled. Note that the license key doesn’t need to be activated on each of the subsites where you want the network wide code to show up.
For example: if you want to change the background color on all the subsites of a multisite installation, then you’ll need to go to My Sites > Main Site > Dashboard and then Custom CSS & JS > Add Custom CSS. There add the CSS rule, for example body {background-color: green;} and check the “Apply network wide” option on the right side menu. The background should turn green on all the subsites of your WordPress installation.
Also shortcodes written as a custom HTML code can be applied network wide. But if a network wide shortcode has the same id as another shortcode defined on a subsite, then the shortcode defined on the subsite will have priority and shown on the particular subsite.
For example: if you want to show the same table on several subsites, then you can go to My Sites > Main Site > Dashboard and then Custom CSS & JS > Add Custom HTML. There add the table’s HTML, select “Where on page: as shortcode”, write a shortcode id, for example “employees-table”, and check the “Apply network wide” option on the right side menu. Afterwards the shortcode can be used on any subsite where the Simple Custom CSS and JS Pro plugin is enabled.
Import/Export Codes
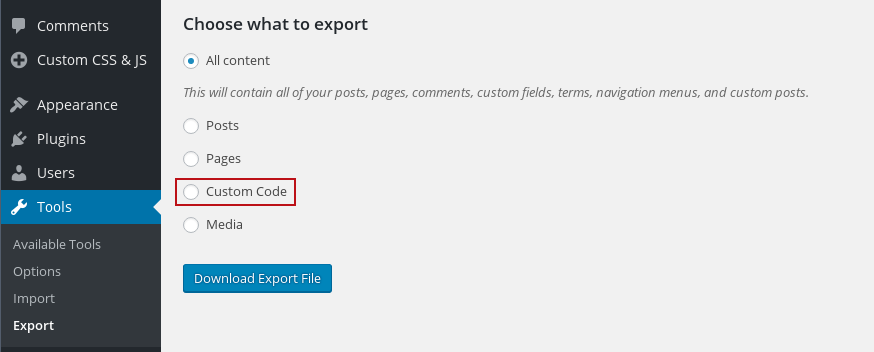
If you are moving to a new host or just want a backup of your site data, then Exporting your code can come very handy. You can export the codes with the native WordPress Export tool located at WP Admin > Tools > Export.
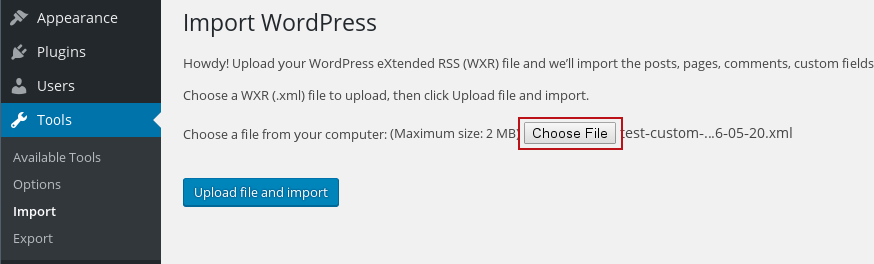
The importing is done also with the native WordPress Import tool, as shown in the screenshot below.
FAQ
Is there any performance penalty to having many individual CSS or Java codes as opposed to one putting it all in one big file?
No, from a performance point of view it makes no difference if you have many small codes or one big code.
When you save a code there is a “codes tree” built and saved in the database and the actual code is saved in a file. When you load a page only the “code tree” is retrieved from the database in order to identify the specific codes that need to be loaded (so only one database query). The internal codes are loaded from the saved files and the external codes are simply linked.
The benchmark test for measuring the loading time showed only minuscule differences between many small files and one big file.
When trying to download the plugin from silkypress.com, I get a folder and not a .zip file
When downloading the plugin from silkypress.com, you definitely get a .zip file.
It could also be that your operating system or the browser is automatically extracting any downloaded zip file. (For example Safari will automatically extract zipped downloads if the Safari > Preferences > General > Open safe files after downloading option is enabled.)
You can also simply create a .zip file out of the folder created after the download and upload that .zip file to your WordPress website as a plugin. That will also work. The .zip file’s name is irrelevant.
Credits
Big thanks to the authors of the following open-source scripts:
- CodeMirror – a great editor for the browser made by Marijn Haverbeke
- CSS and JS minifier written by Matthias Mullie
- lessc.php – a LESS preprocessor written by Leaf Corcoran
- scssphp.php (for PHP <7.2), and scssphp (for PHP >=7.2) – SASS compilers, both written mainly by Leaf Corcoran.
- ThriveDesk – an AI-powered customer support platform.
- and last but not least, the WordPress community