Multi-Step Checkout Pro for WooCommerce – Documentation
Installation and Updates
- Download the .zip file from the email you received.
- Go to: WordPress Admin > Plugins > Add New to upload the file you downloaded with Choose File.
- Activate the plugin.
More information at: Installing and Managing Plugins.
If you already have the free version of the plugin installed on your website, the PRO version will automatically overtake the configurations from the free version and will disable the free version plugin during the activation. You can choose to keep the disabled free version on your website or you can delete it.
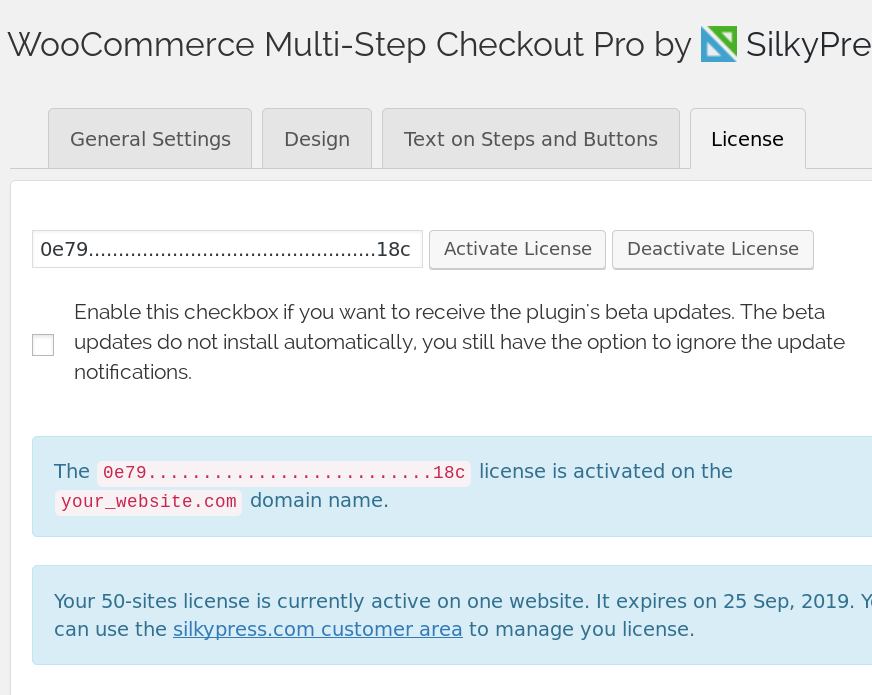
In order to receive unlock all the plugin’s functionality and receive the updates, don’t forget to activate your license, as shown below.
For updates you’ll be notified in the WorPress Admin -> Plugins page and by clicking update now you will receive the latest version.
Customizations
You can add/remove/modify the steps with the help of PHP snippet that you can add to your child theme’s functions.php file. If you don’t feel comfortable modifying the child theme’s functions.php file, then you can use a plugin similar to Code Snippets.Removing a step
The following PHP snippet will remove the Billing step:
if ( ! function_exists( 'wmsc_delete_billing_step' ) ) {
	function wmsc_delete_billing_step( $steps ) {
	    unset( $steps['billing'] );
	    return $steps;
	}
}
add_filter( 'wpmc_modify_steps', 'wmsc_delete_billing_step' );
Modifying a step
Any of the steps can be modified by copying the “wmsc_step_content_{id}” function from the plugin’s /includes/settings-array.php file to your child theme’s functions.php file. Then you’ll need to rename the function to something else, for example “wmsc_step_content_{your_id}”. And then use the “wpmc_modify_steps” action to load the step’s content from the new “wmsc_step_content_{your_id}” function. The {id} stands for the step’s id that you wish to change.
For example, to modify the Payment step, you’ll need to copy the wmsc_step_content_payment function from the plugin’s /includes/settings-array.php file to your child theme’s functions.php file and then modify the function’s title from wmsc_step_content_payment to wmsc_step_content_payment_modified:
if ( ! function_exists( 'wmsc_step_content_payment_modified' ) ) {
    function wmsc_step_content_payment_modified() {
        echo '<h3 id="payment_heading">' . __( 'Payment', 'woocommerce' ) . '</h3>';
        echo 'Modify the "Payment" step by adding this message after the "Payment" step header';
        do_action( 'wpmc-woocommerce_checkout_payment' );
        do_action( 'woocommerce_checkout_after_order_review' );
    }
}
add_action( 'wmsc_step_content_payment_modified', 'wmsc_step_content_payment_modified' );
Now the $steps array needs to be modified in order for it to load the content from the new wmsc_step_content_payment_modified function instead of from the wmsc_step_content_payment function:
if ( ! function_exists( 'wpmc_review_modify_payment_step' ) ) {
    function wpmc_review_modify_payment_step( $steps ) {
        $steps['payment']['sections'] = array( 'payment_modified' );
        return $steps;
    }
}
add_filter( 'wpmc_modify_steps', 'wpmc_review_modify_payment_step' );
Note: When modifying/adding a step’s content and a WooCommerce hook needs to be inserted with “$checkout” as the second argument, for example:
do_action( 'woocommerce_after_order_notes', $checkout );
// or
do_action( 'woocommerce_after_checkout_shipping_form', $checkout );
Notice: Undefined variable: checkout ... error shows up, then you need to define the $checkout variable before the hook with the following line:
$woocommerce = WC_Checkout::instance();Adding a step
You can use the “wpmc_modify_steps” filter to add a custom step and the “wmsc_step_content_{step_id}” action to add the content to your {step_id} step. The {step_id} is defined by in the “sections” parameter within the the”wpmc_modify_steps” filter. For example the following PHP snippet will add the custom step called “Delivery Time” after the Shipping step:
/**
 * Add the Delivery Time step
 */
if ( ! function_exists( 'wpmc_add_delivery_time_step' ) ) {
	function wpmc_add_delivery_time_step( $steps ) {
	    $steps['delivery'] = array(
		'title'     => __( 'Delivery Time' ),
		'position'  => 25,
		'class'     => 'wpmc-step-delivery',
		'sections'  => array( 'delivery' ),
	    );
	    return $steps;
	}
}
add_filter( 'wpmc_modify_steps', 'wpmc_add_delivery_time_step' );

/**
 * Add content to the Delivery Time step
 */
if ( ! function_exists( 'wmsc_step_content_delivery' ) ) {
    function wmsc_step_content_delivery() {
        echo 'The content of the Delivery Time step';

        // Add the date field called "Choose Date"
        $checkout = WC()->checkout();
        woocommerce_form_field( 'delivery_time', array(
            'type'  => 'date',
            'class' => array('my-field-class form-row-wide'),
            'label' => __('Choose Date'),
        ), $checkout->get_value( 'delivery_time' ) );
    }
}
add_action( 'wmsc_step_content_delivery', 'wmsc_step_content_delivery' );

/**
* Add your validation rules to the `delivery_time` field
*/
function wmsc_validate_delivery_time_field() {
    if ( ! $_POST['delivery_time'] || empty( $_POST['delivery_time'] ) ) {
        wc_add_notice( __( 'Please enter the delivery time.' ), 'error' );
    }
}
add_action( 'woocommerce_checkout_process', 'wmsc_validate_delivery_time_field' );

/**
 * Save the `delivery_time` field with the order
 */
function wmsc_save_delivery_time_field( $order_id ){
    if ( ! empty( $_POST['delivery_time'] ) ) {
        update_post_meta( $order_id, 'delivery_time', sanitize_text_field( $_POST['delivery_time'] ) );
    }
}
add_action( 'woocommerce_checkout_update_order_meta', 'wmsc_save_delivery_time_field' );
As the step’s position is 25, it will be shown between the Shipping and Payment step.
Note that the new step’s content will be inside the checkout <form> element and the HTML standard doesn’t allow to nest forms inside each other. You can add static content to the new step, dynamic content (like Up-Sells) or custom checkout form fields. But you cannot add another form inside the step, as for example a form generated with the Contact 7, Gravity Form or Ninja Forms plugin.
Modifying a step’s position
The following PHP snippet will move the Shipping step into the last position:
if ( ! function_exists( 'wmsc_shipping_step_last' ) ) {
	function wmsc_shipping_step_last( $steps ) {
	    $steps['shipping']['position'] = 60;
	    return $steps;
	}
}
add_filter( 'wpmc_modify_steps', 'wmsc_shipping_step_last' );
The default step ids and positions
The steps are sorted in ascended order by their “position” parameter.| Step | id | position |
| Billing | billing | 10 |
| Shipping | shipping | 20 |
| Payment | payment | 30 |
| Order | review | 40 |
Custom validation rule in the “step-by-step validation”
If you remove or add the “required” rule to any field with the help of a plugin that modifies the checkout fields, then the Multi-Step Checkout Pro for WooCommerce plugin will automatically pick up the validation rule modification.
If you want to add a custom validation rule to the checkout fields, then you can register the new validation rule with the “wmsc_custom_validation” hook. For example, the following PHP code snippet will show an error if there are numbers present within the first or the last name in the Billing step:
if ( ! function_exists( 'wmsc_validate_fname_lname' ) ) {
    function wmsc_validate_fname_lname( $errors, $fields ) {
        if ( preg_match( '/\\d/', $fields[ 'billing_first_name'] ) ) {
            $errors[ 'billing_first_name' ] = __( '<b>Billing First name</b> field does not allow numbers.' );
        }
        if ( preg_match( '/\\d/', $fields[ 'billing_last_name'] ) ) {
            $errors[ 'billing_last_name' ] = __( '<b>Billing Last name</b> field does not allow numbers.' );
        }
        return $errors;
    }
}
add_action( 'wmsc_custom_validation', 'wmsc_validate_fname_lname', 10, 2 );
Delete a step based on products in the cart
Sometimes a step is unnecessary if certain products are present in the cart. For example, a shop might sell both digital and physical products, but if only digital products are present in the cart, then no Shipping step is necessary on the checkout page.
In this case you can use the wmsc_delete_step_by_category filter to remove a certain step based on the categories of the products found in the cart. For example, the following PHP snippet will remove the “shipping” step if at least one product from the “category1” or “category2” categories is in the cart:
add_filter( 'wmsc_delete_step_by_category', function( $settings ) {
    $settings['remove_step'] = 'shipping';
    $settings['one_product_in_categories'] = array( 'category1', 'category2' );
    return $settings;
} );
Other available options you can set for the 3rd line of the PHP snippet are:
$settings['all_products_in_categories'] = array('category1', 'category2'); – will remove the step if all the products are part of the ‘category1’ or ‘category2’ categories.
$settings['one_product_in_all_except_categories'] = array('category1', 'category2'); – will show the step if at least a product is part of the ‘category1’ or ‘category2’ categories. Remove the steps for the other categories.
$settings['all_products_in_all_except_categories'] = array('category1', 'category2'); – will show the step if all the products are part of the ‘category1’ or ‘category2’ categories. Remove the steps for the other categories.
Customization examples
Adding a “Cross-Sales” step
Cross-sells are complementary products the buyer might be interested in, which are related to the products he is already buying. See this article on how to set up the cross-sells for your products. For adding a custom step with cross-sells, you’ll need to add the following PHP snippets to your website.
Add the step after Shipping:
if ( ! function_exists( 'wpmc_add_cross_sales_step' ) ) {
    function wpmc_add_cross_sales_step( $steps ) {
        $steps['cross_sales'] = array(
          'title'     => __( 'Cross-Sales' ),
          'position'  => 25,
          'class'     => 'wpmc-step-cross-sales',
          'sections'  => array( 'cross_sales' ),
        );
        return $steps;
    }
}
add_filter( 'wpmc_modify_steps', 'wpmc_add_cross_sales_step' );
if ( ! function_exists( 'wmsc_step_content_cross_sales' ) ) {
    function wmsc_step_content_cross_sales() {
        $orderby = 'rand';
        $order = 'desc';
        $limit = 2;
        $columns = 2;

        // Get visible cross sells then sort them at random.
        $cross_sells = array_filter( array_map( 'wc_get_product', WC()->cart->get_cross_sells() ), 'wc_products_array_filter_visible' );

        wc_set_loop_prop( 'name', 'cross-sells' );
        wc_set_loop_prop( 'columns', apply_filters( 'woocommerce_cross_sells_columns', $columns ) );

        // Handle orderby and limit results.
        $orderby     = apply_filters( 'woocommerce_cross_sells_orderby', $orderby );
        $order       = apply_filters( 'woocommerce_cross_sells_order', $order );
        $cross_sells = wc_products_array_orderby( $cross_sells, $orderby, $order );
        $limit       = apply_filters( 'woocommerce_cross_sells_total', $limit );
        $cross_sells = $limit > 0 ? array_slice( $cross_sells, 0, $limit ) : $cross_sells;

        wc_get_template(
            'cart/cross-sells.php',
            array(
                'cross_sells'    => $cross_sells,

                // Not used now, but used in previous version of up-sells.php.
                'posts_per_page' => $limit,
                'orderby'        => $orderby,
                'columns'        => $columns,
            )
        );
    }
}
add_action( 'wmsc_step_content_cross_sales', 'wmsc_step_content_cross_sales' );
Questions & Answers
After registering is the customer redirected to the account page or the next step?
A: To the next step. Normally the “Billing” is the next step after Login/Registration, so in that case the customer will be redirected to the “Billing” step.Can I edit the “Your personal data will be used to …” text after the Registration form?
A: Yes, you can edit it on theWP Admin -> WooCommerce -> Settings -> Accounts & Privacy page within the “Registration privacy policy” option.
How can I link a certain step?
A: If you enable the “Change the URL for each step” option on theWP Admin -> WooCommerce -> Multi-Step Checkout Pro page, then each step’s link will be different. For example: the Billing step can be linked with the “http://example.com/checkout/#billing” URL.
How to track the individual steps with Google Analytics?
A: By enabling the “Change the URL for each step” option on theWP Admin -> WooCommerce -> Multi-Step Checkout Pro and by setting up the “History Change Trigger” options within the Google Tag Manager, you can track the individual steps with Google Analytics. See this article for more details about “History Change Trigger” settings.
How do I remove the “Back” button from the last step?
A: You can do that by adding the following JavaScript code to your website:
jQuery(document).ready(function($){
    $( '.woocommerce-checkout' ).on( 'wpmc_after_switching_tab', function() {
       if ( $( '.wpmc-tabs-wrapper li.wpmc-tab-item:last-child' ).hasClass( 'current' ) ) {
          $( '#wpmc-prev' ).hide().removeClass( 'current' );
       } else {
          $( '#wpmc-prev' ).show();
       }
    });
});
How do I remove the “Skip Login” button from the Login step?
If you uncheck the “Allow customers to place orders without an account” and the “Allow customers to create an account during checkout” options on theWP Admin -> WooCommerce -> Settings -> Accounts & Privacy page, then the “Skip Login” button will not show up. See this screenshot.
How do I modify the If you have shopped with us before, please enter ... text on the Login step?
The message can be modified by adding the following PHP snippet to your child theme’s functions.php file:
add_filter( 'woocommerce_checkout_logged_in_message', function($message) {
    return 'Your message here';
});
How do I arrange the billing fields so that the postcode and city fields are on the same line?
A: If you add the following CSS rules to your website, then the postcode and city fields will be shown on the same line:
@media screen and (min-width: 550px) {
    #billing_postcode_field {
        margin-right: 2%;
    }

    #billing_postcode_field, #billing_city_field {
        width: 49%;
        float: left;
    }
    #billing_city_field {
    	clear: none;
    }
}
@media screen and (min-width: 550px) {
    #billing_phone_field {
        margin-right: 2%;
    }

    #billing_phone_field, #billing_email_field {
        width: 49%;
        float: left;
    }
    #billing_email_field {
    	clear: none;
    }
}
@media screen and (min-width: 550px) {
    #billing_address_1_field {
        margin-right: 2%;
    }

    #billing_address_1_field, #billing_address_2_field {
        width: 49%;
        float: left;
    }
    #billing_address_2_field {
    	clear: none;
    }
    #billing_address_2_field .screen-reader-text {
	height: auto;
	width: auto;
	position: relative !important;
    }
}